
You either have heard about WURFL and Device Detection before OR you have not. In either case, read on.
Device Detection is the art of squeezing the most information possible out of HTTP requests generated by browsers on tablets, smartphones, SmartTVs, and the watches of people that surf the web from their wrist.
Born in 2001, WURFL is the oldest and arguably the most well known Device Detection framework. While it started off as an open source-project, WURFL went commercial in 2011 as ScientiaMobile’s flagship product.
In essence, WURFL allows programs to map HTTP requests to the properties of the browser and devices that generated them. In the beginning of time (which for mobile developers is somewhere around 1998 and 2003) the primary use case for Device Detection was UX optimization. There was no way an HTML website could be scaled down to work on mobile devices available in those years. The arrival of Responsive Web Design and smartphones has made that use case less relevant in the last 10 years or so, but other use cases have become more relevant. Among these are Analytics and Ad Tech, i.e. determining which ads are most suited for a user’s device.
Another use case has come to my attention a couple of years ago as an offshoot of the wider Unified Logging (Kafka, Kinesis, …). I am talking about Event Stream analysis, i.e. the ability to extract useful information out of a stream of data that’s too much to store in one place and analyze off-line. This use case has interesting applications in different industries, for example for the purpose of detecting failures and defects in products and services (a good book that explains Event Streams is Event Streams in Action, published by Manning).
Enter WURFL Microservice
WURFL Microservice (WM) is the latest incarnation of the WURFL API. From the perspective of the final result, WM is an API that one can deploy locally just like other traditional WURFL APIs.
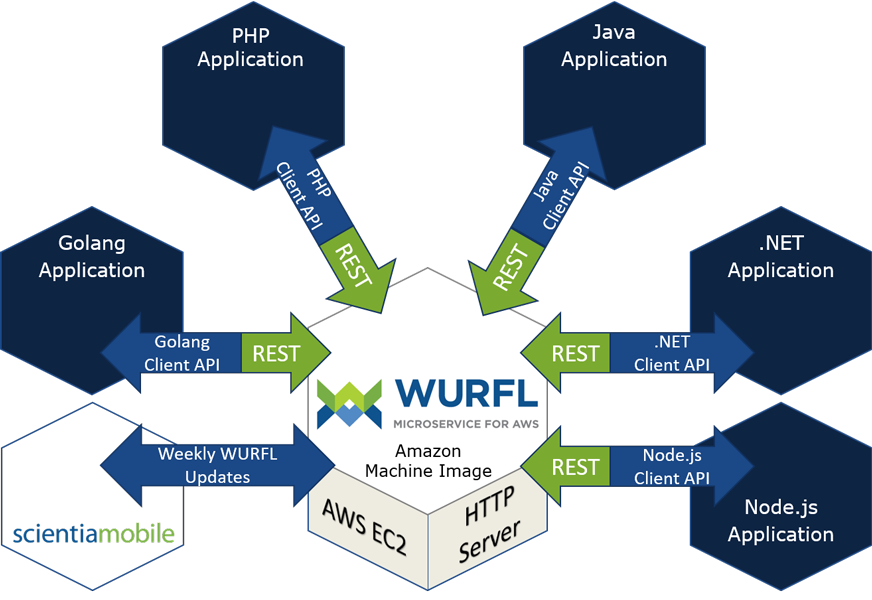
If you are already familiar with one of the “classic” WURFL APIs (such as the ones for Java, PHP, and .NET), the use of WURFL Microservice will be simple to grasp. It’s still about having an API that maps HTTP requests to browser and device properties.
But there are some significant differences as compared to the other APIs. First, you will not need to buy a WURFL license from ScientiaMobile. Rather you can “rent it” from the AWS Marketplace, sort of similarly to how you would lease a car rather than buying it. If you like WURFL and you already have a relationship with AWS, you can charge your device detection check to your AWS account, not very differently from how you would charge a drink to your room when you are staying at a hotel.
But there is more: with WURFL Microservice data and API updates happening transparently. Just use the WM API: ScientiaMobile updates the data and API regularly in the back-end. While some companies want to be in control of each and every update of their system, others are happy with WURFL taking care of its own updates. In that case, WURFL Microservice for AWS is for you.
Enough talk. Time to look at some code and how to deploy it. For this tutorial, we picked the Event Streams use case.
Deploying the WURFL AWS AMIs (Amazon Machine Image)
In this tutorial, you’ll learn how to create an event-streaming application powered by WURFL Microservice. Our first step is to acquire a WURFL Microservice AMI from the AWS marketplace. Secondly, we will launch a demo application that queries the WURFL Microservice API to enrich a JSON data stream with device data.
Note: The two applications used in this tutorial are written in Java, but they can be easily ported to any of the other languages that WURFL Microservice supports. At the time of this writing: Golang, .NET, PHP and Node.js.
Scenario: fictional company Petflix serves user-generated video content through several channels (web, tablets, smartphones, SmartTVs, etc.). This generates a stream of HTTP requests from users. The system needs to tag the requests for videos that “failed”, i.e. that didn’t play or played with poor quality. The video success/failure information is stored in the “Event” JSON property.
Our demo application consists of two Java console programs:
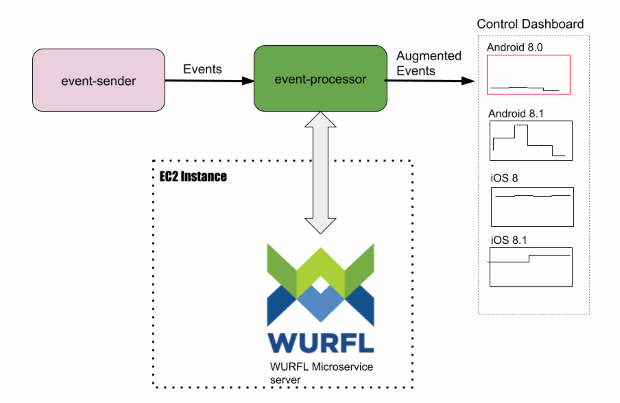
- Event-sender simulates the “production” of events from our system. Each event is essentially the JSON representation of HTTP requests enriched with an Event field that records the outcome of the streaming operation. Events are “printed” to the standard output at regular time intervals.
- Event-processor processes the JSON data sent by the event-sender on the standard input and relies on the WURFL Microservice client API to perform device detection and augment events with device information. The Client API looks like a local API but “talks HTTP” to the WURFL Microservice server running on the EC2 AMI instance.
The stream of augmented JSON data is then made available on the standard output.
For example, event-sender might produce these two events:
{
  "Accept-Language": "hu-HU,hu;q=0.8,en-US;q=0.6,en;q=0.4",
  "Accept-Encoding": "gzip, deflate, lzma, sdch",
  "Accept": "*/*",
  "User-Agent": "Mozilla/5.0 (Windows NT 5.1) AppleWebKit/537.36 (KHTML, like Gecko)
                 Chrome/49.0.2623.112 Safari/537.36 OPR/36.0.2130.80",
  "Video-id": "TPhZnruRPsM",
  "Event": "VIDEO_OK"
}

{
  "Accept-Language": "zh-TW,zh;q=0.9,en-US;q=0.8,en;q=0.7",
  "Accept-Encoding": "gzip, deflate",
  "User-Agent": "Mozilla/5.0 (Linux; Android 8.0.0; HTC_U-1u Build/OPR1.170623.032; wv)
                 AppleWebKit/537.36 (KHTML, like Gecko) Version/4.0 Chrome/78.0.3904.108
                 Mobile Safari/537.36 JsSdk/2 TopBuzz/12.5.6 NetType/4G",
  "Accept": "*/*",
  "Event": "VIDEO_FAILURE",
  "Video-id": "TPhZnruRPsM"
}
Event-processor would read those events from the standard input and augment them with the following data:
{
  "Accept-Language": "hu-HU,hu;q=0.8,en-US;q=0.6,en;q=0.4",
  "Accept-Encoding": "gzip, deflate, lzma, sdch",
  "Wurfl-Form-Factor": "Desktop",
  "Accept": "*/*",
  "User-Agent": "Mozilla/5.0 (Windows NT 5.1) AppleWebKit/537.36 \
          (KHTML, like Gecko) Chrome/49.0.2623.112 Safari/537.36 \
           OPR/36.0.2130.80",
  "Video-id": "TPhZnruRPsM",
  "Wurfl-Device-Model": "Opera",
  "Wurfl-Device-Make": "Opera Software",
  "Wurfl-Device-OS": "Windows XP",
  "Event": "VIDEO_OK"
}
{
  "Wurfl-Device-OS": "Android 8.0.0",
  "Accept-Language": "zh-TW,zh;q=0.9,en-US;q=0.8,en;q=0.7",
  "Accept-Encoding": "gzip, deflate",
  "Wurfl-Complete-Name": "HTC U Ultra",
  "Wurfl-Form-Factor": "Smartphone",
  "User-Agent": "Mozilla/5.0 (Linux; Android 8.0.0; HTC_U-1u \
                 Build/OPR1.170623.032; wv) AppleWebKit/537.36 \
                 (KHTML, like Gecko) Version/4.0 Chrome/78.0.3904.108 \
                 Mobile Safari/537.36 JsSdk/2 TopBuzz/12.5.6 NetType/4G",
  "Accept": "*/*",
  "Event": "VIDEO_FAILURE",
  "Wurfl-Device-Model": "U Ultra",
  "Wurfl-Device-Make": "HTC",
  "Video-id": "TPhZnruRPsM"
}
Overall scenario
The following diagram explains the flow of events and how it gets generated and augmented by event-sender and event-processor respectively:
In this tutorial, we are going to illustrate the following steps:
- Obtain and deploy a WURFL Microservice AMI from the AWS Marketplace
- Launch the WURFL Microservice AMI instance
- Build and launch the event-sender and event-processor applications
- Illustrate use of WURFL Microservice client API in event-processor
Prerequisites
- Java Virtual Machine with SDK version 8 or above
- Apache Maven 2.x or above
- Amazon AWS account
Obtain the WURFL Microservice AMI from AWS
Visit the AWS Marketplace and search for WURFL in the search text box.
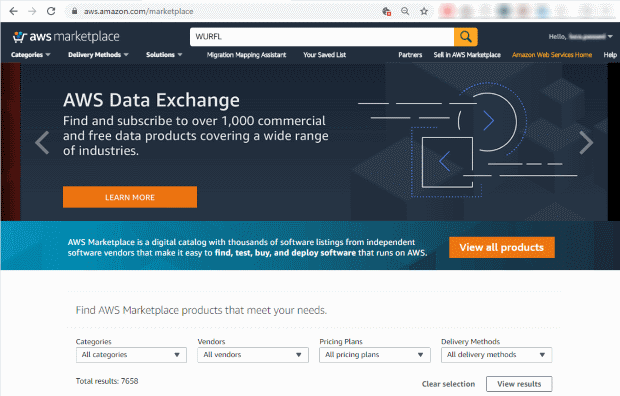
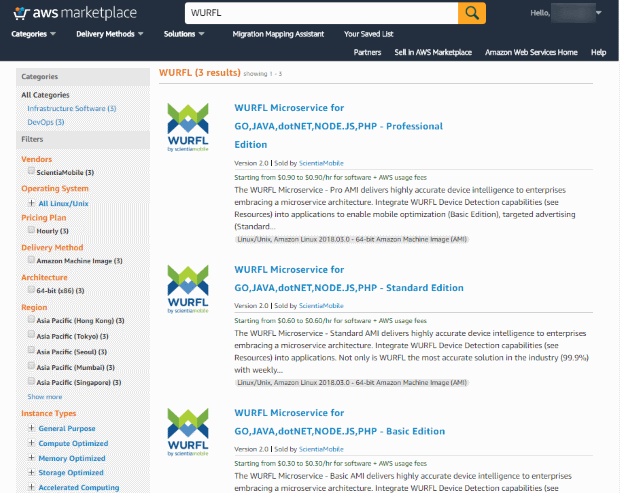
Choose the WURFL Microservice version that fits your needs. You can pick Basic, Standard or Professional. For the purposes of this tutorial, you will need either the Standard or the Professional edition.
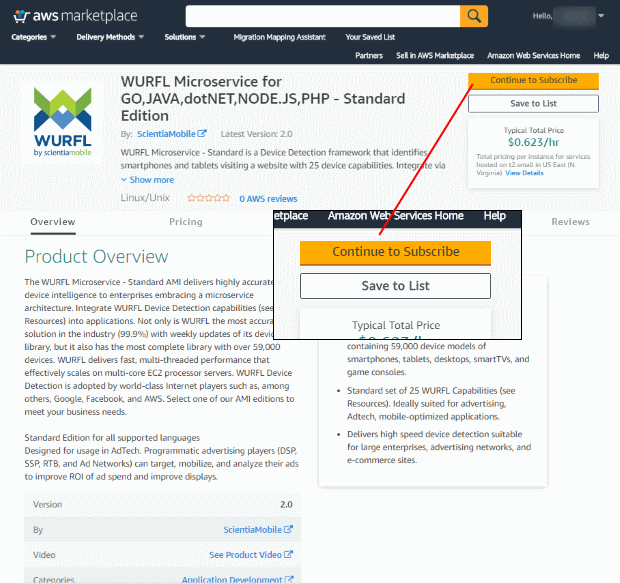
Click on the orange “Continue to Subscribe” button.
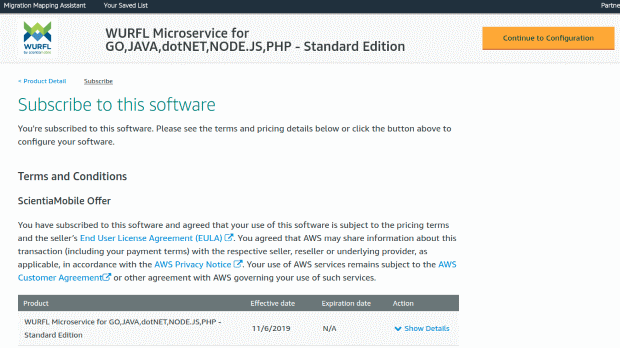
In the “Subscribe to this software” section you can review the WURFL Microservice offer, pricing and all documents related to your license. Click on the “Continue to Configuration” button.
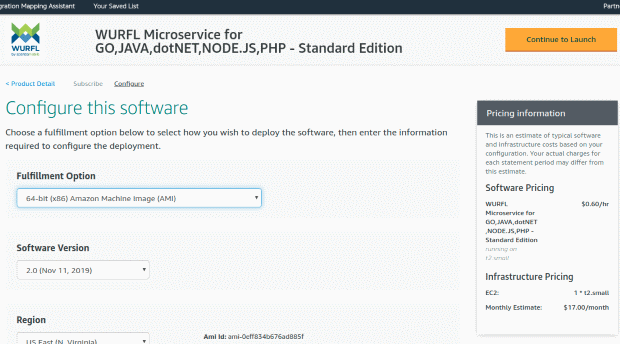
On the configuration page you can choose the version of WURFL Microservice. Choose the default selected 2.0 version. Choose the AWS region where the AMI instance will be hosted and the default selected Fulfillment Option (64 bit x86 Amazon Machine Image). Then click on the “Continue to Launch button”.
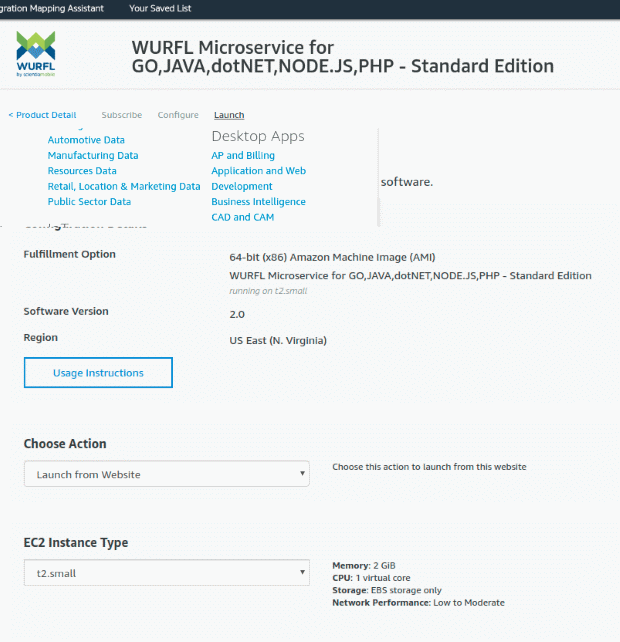
We are now ready to launch our first AMI instance. To do that, select the “Launch through EC2” item on the “Choose Action” dropdown list.
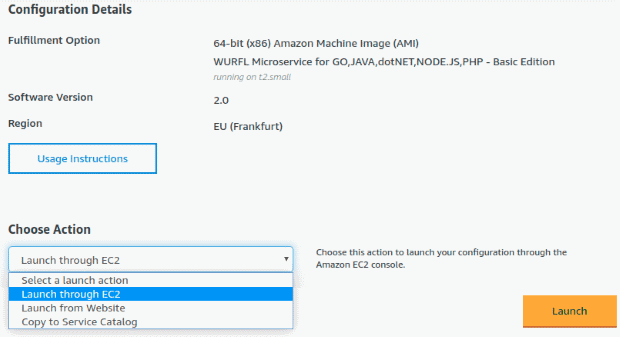
Then click on the “Launch” button.
You will probably want to manage all your AMIs from the EC2 console, in order to control your AMI usage. In that case, select “Launch through EC2”.
WURFL Microservice AMI instance
Once you launch your AMI, here is the dashboard that lists all AMIs available in your account:
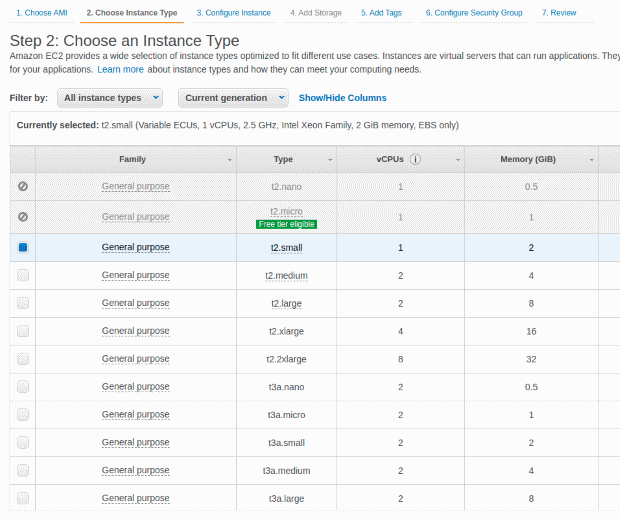
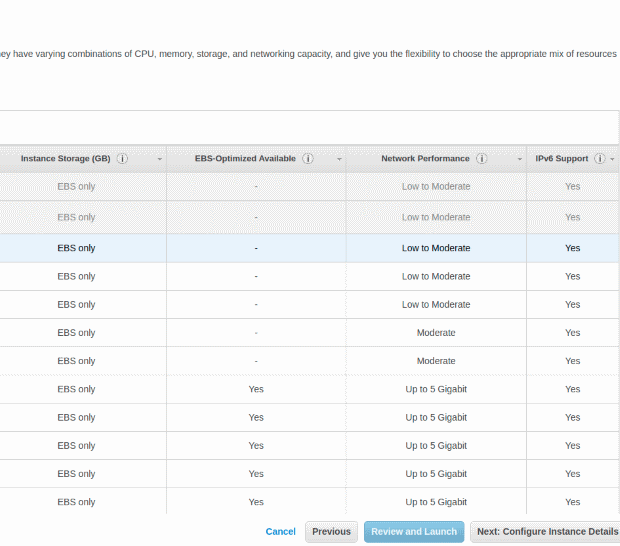
To launch the WURFL Microservice AMI, you first need to pick an instance type. For the purpose of this tutorial, you can go for the t2.small type and click on the “configure instance details” button (more information on AWS AMI sizes can be found here).
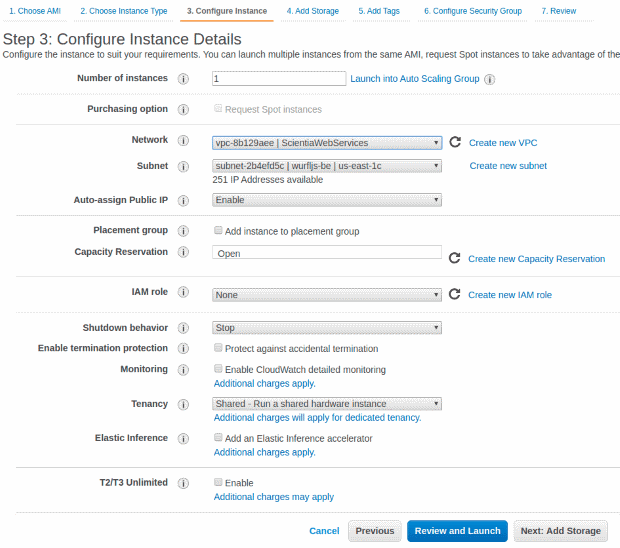
For the purpose of the tutorial, the only data you need to set in this step is “Enable Auto-assign Public IP”. You can skip the add storage and tags steps and click on the “Configure Security Group” tab (the screenshot that follows was “split” to fit the screen) .

Security group configuration opens ports 80 and 22 by default. Port 80 is used to talk HTTP to the WURFL Microservice HTTP server, while port 22 allows SSH access to the AMI instance.
If for some reason, port 80 is not open by default, you will need to add it by clicking on the “Add Rule” button.
It’s now time to review our instance by clicking on the “Review Instance Launch” button.
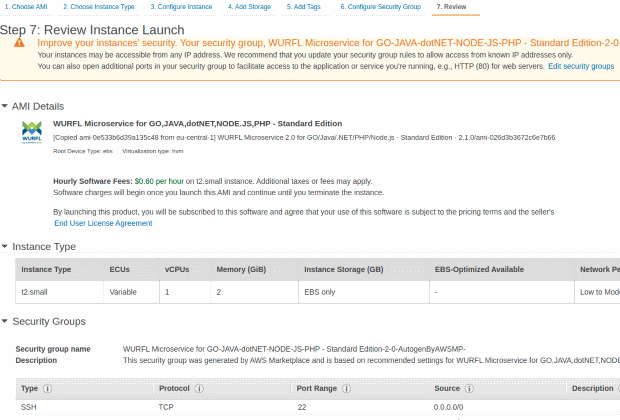
Review your configuration and, if everything looks correct, click on “Launch”.
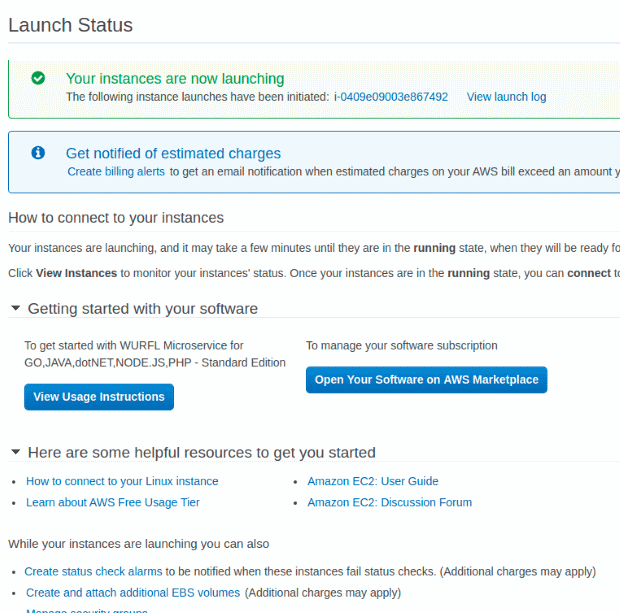
Click on the “View Instances” button to go to the dashboard that displays running AMIs.
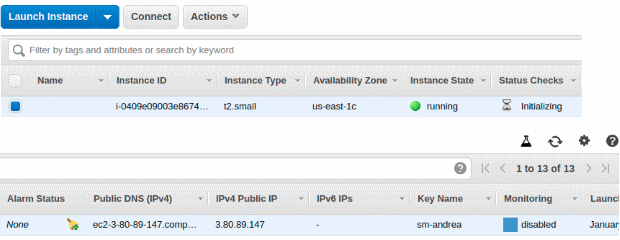
By selecting the row of the newly created WURFL Microservice AMI instance, you’ll have access to the instance details.

Copy the IP address that you see in the “IPv4 Public IP” text field, open a browser and visit the http://<value_of_public_ip_field>/v2/status/json URL address. You should see a small JSON object that vouches for the health of your installation.
Alternatively, you can use curl from the command line: assuming your IP is 3.80.89.147, if your instance responds with something like this, you are golden. Your WURFL Microservice server is up and running!
$ curl  http://3.80.89.147/v2/status/json
{
    "lookup_request": 0,
    "lookup_useragent": 0,
    "lookup_device_id": 0,
    "make_model_requests": 0,
    "server_info_requests": 8,
    "v1_capabilities_requests": 0,
    "not_found_404": 0,
    "server_uptime": 1172
}
Build and launch of the event-sender application and event-processor application
Obtain the demo application from this GitHub Repo. It’s a standard Java application that you can build and launch with Maven:
$ cd event-sender-java
$ mvn clean package
$ cd ../event-processor-java
$ mvn clean package
Once the applications are built, you’ll want to open a terminal window and launch both applications, piping the sender output to the processor input and setting the — host flag to the IP of your running WURFL Microservice server instance.
Assuming the IP is, for example, 3.80.89.147, the command will be:
$ java -jar ../event-sender-java/target/event-sender.jar | \
  java -jar target/event-processor.jar --host 3.80.89.147
Note: the event-sender application will simply read a local file of HTTP requests in JSON format and “replay” them on the standard output to simulate a stream of events. Not a lot of magic there.
The event-processor will process the event stream and release data to the standard output. The data is the same JSON data it received in input augmented with WURFL device information:
{
  "Accept-Language": "zh-TW,zh;q\u003d0.9,en-US;q\u003d0.8,en;q\u003d0.7",
  "Accept-Encoding": "gzip, deflate",
  "X-Forwarded-For": "118.233.181.65",
  "Accept": "*/*",
  "User-Agent": "Mozilla/5.0 (Linux; Android 9; ASUS_X01AD Build/WW_Phone-201911231308; wv)
                 AppleWebKit/537.36 (KHTML, like Gecko) Version/4.0 Chrome/79.0.3945.93
                 Mobile Safari/537.36 [FB_IAB/FB4A;FBAV/251.0.0.31.111;]",
  "Event": "VIDEO_OK",
  "Sec-Fetch-Site": "cross-site",
  "Sec-Fetch-Mode": "no-cors",
  "Wurfl-Complete-Name": "Asus X01AD (Zenfone Max M2)",
  "Wurfl-Device-OS": "Android 9.0",
  "Wurfl-Form-Factor": "Smartphone",
  "Wurfl-Device-Make": "Asus",
  "Wurfl-Device-Model": "X01AD",
  "timestamp": 6922396444999
}
WURFL Microservice client API usage in event-processor
While the code in the event-sender application does not need much explanation, the event-processor code is more interesting: it uses what is, effectively, a fully-fledged WURFL API by communicating with the WURFL Microservice server through HTTP (such communication is virtually transparent to the API user, but knowing what is going on under the hood may still be nice to know).
Note: ScientiaMobile doesn’t usually refer to cloud-based products as a WURFL API to avoid creating confusion with its “classic” local API products. We prefer to call those Client APIs (which implies that there’s a server somewhere, which is in fact the case). Having said this, from a developer perspective, a Client API and a WURFL API are very similar, almost indistinguishable products: both products will feel as a local API and fulfill the basic function of mapping HTTP requests to a list of device properties (AKA capabilities).
The pom.xml in the event-processor-java directory instructs Maven to download the dependencies and add them to the classpath the WURFL Microservice client API:
<dependency>
   <groupId>com.scientiamobile.wurflmicroservice</groupId>
   <artifactId>wurfl-microservice</artifactId>
   <version>2.0.0</version>
</dependency>
In Processor.java, we import the client API classes we need:
import com.scientiamobile.wurfl.wmclient.Model;
import com.scientiamobile.wurfl.wmclient.WmClient;
import com.scientiamobile.wurfl.wmclient.WmException;
We create the WURFL Microservice client class as soon as the event processor starts:
  wmClient = WmClient.create("http", host, "80", "");
  wmClient.setCacheSize(20000);
} catch (WmException e) {
  // error message and exit from app
}
The host variable value is set in the command line launch command.
In our code, we set the cache size to 20,000 elements, but you may want to go for a larger number (say 100,000 or more) in production systems. Keep in mind that, once device information is expunged from cache, retrieving it again will cause an HTTP roundtrip to our WM Server, and this operation is several magnitudes slower than in-memory operations.
Once we have our WURFL data, enriching the input JSON data with WURFL device data is easy peasy.
HttpServletRequestMock request = new HttpServletRequestMock(eventData.getHeaders());
Model.JSONDeviceData device = wmClient.lookupRequest(request);
eventData.setWurflCompleteName(device.capabilities.get("complete_device_name"));
eventData.setWurflDeviceMake(device.capabilities.get("brand_name"));
eventData.setWurflDeviceModel(device.capabilities.get("model_name"));
eventData.setWurflFormFactor(device.capabilities.get("form_factor"));
eventData.setWurflDeviceOS(device.capabilities.get("device_os") + " " \
                    + device.capabilities.get("device_os_version"));

// convert Java object to JSON and send it to standard output
System.out.println(gson.toJson(eventData));
Time for some DataViz
Now that we have our enriched JSON data, we might just as well use it for some data visualization. For example, we might want to look deeper into those failed (Video: KO) events.
Let’s capture the streamed data into enriched_event_stream.json and use some basic data visualization tool to make the data speak and tell us what is making those video events fail.
First, let’s prepare the headers of a TSV file that will contain three columns:
- OS and Version,
- Event Status and
- Complete name of the client.
$ echo -e "OS and Version\tStatus\tComplete Name" > os_breakdown.tsv
If you are reading this tutorial, you may have heard of a tool called jq. If you have not, check it out. It’s pretty cool. It’s a bit like sed and awk together, but specifically for JSON files.
The following command will read our JSON, pick the fields we are interested in out of each enriched JSON object and print it in TSV format:
$ jq -r '[."Wurfl-Device-OS", .Event, ."Wurfl-Complete-Name"] | \
          @tsv' enriched_event_stream.json >> os_breakdown.tsv

$ head os_breakdown.tsv
OS and Version  Status Complete Name
Android         VIDEO_OK Opera Mini 5
Android 4.2.2   VIDEO_OK Generic Android 4.0
Android 9       VIDEO_OK Samsung SM-N9600 (Galaxy Note9)
iOS 13.3        VIDEO_OK Apple iPhone
Windows 10      VIDEO_OK Opera Software Opera
Android 9       VIDEO_OK Huawei COL-L29 (Honor 10)
iOS 13.3        VIDEO_OK Apple iPhone 7 Plus
Android 6.0.1   VIDEO_OK Xiaomi Redmi Note 3
Android 5.0.2   VIDEO_OK Generic Android 5.0

$ wc -l os_breakdown.tsv
3001 os_breakdown.tsv
Loading the TSV in a spreadsheet allows a fair amount of analysis and visualization. Let’s first import our data in Google Sheet:
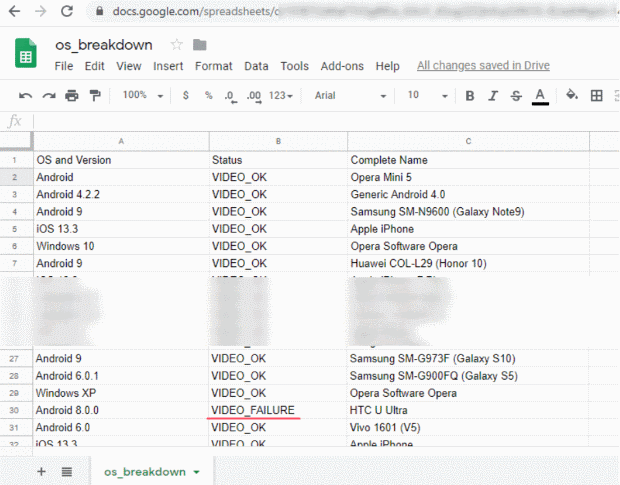
Let’s group all “OS and Version” fields with a pivot table in search of correlations.
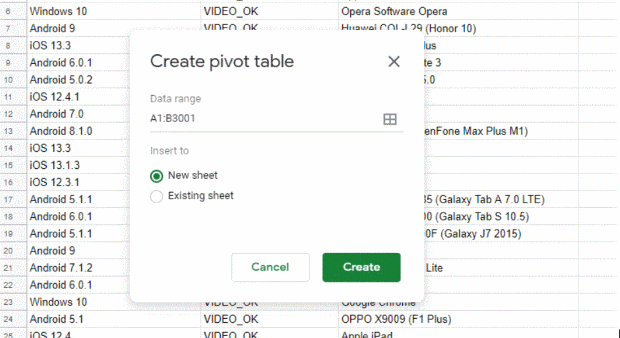
Data > Pivot table and the selection of the data we care about will bring us to this:
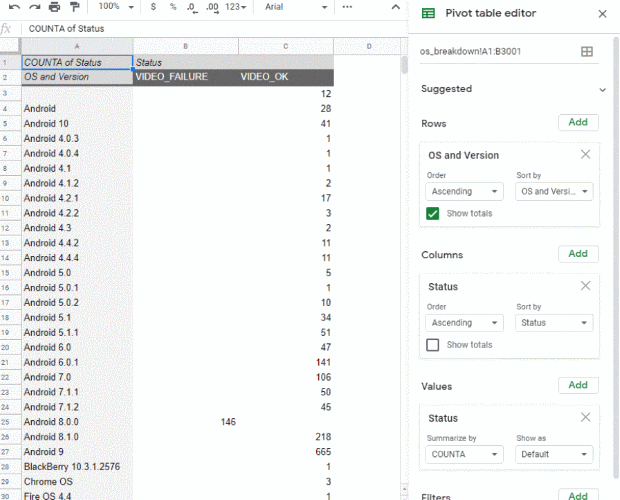
This is already sort of revealing. Android 8.0.0 sticks out as a sore thumb. Let’s visualize with one of the many charts offered by Google Sheet (Insert > Chart).
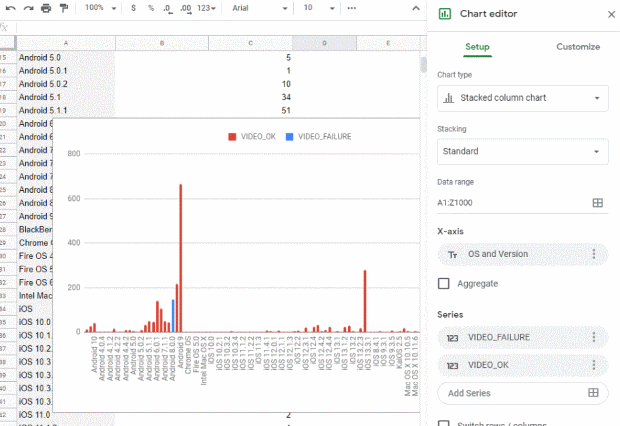
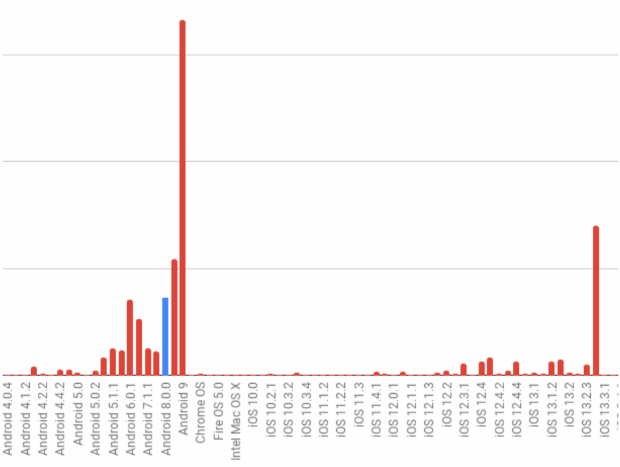
Yes, that’s exactly what we suspected. Devices running Android 8.0.0 don’t seem to stomach this particular bit of video content much. The Petflix engineering team can be informed of where they can start looking to address the issue:
Of course, while we have used a spreadsheet to explore our data sort of manually, all analytics wizards out there will have already recognized the possibilities provided by the several Snowplow, Elastic, Splunk, Tableau, Talend, Snowflake, Zoomdata (Logi Analytics),Databricks, Azure Data Explorer, Amazon Redshift, Yellowbrick and the plethora of business intelligence tools, data marts, log analytics tools out there. Covering those would fall outside of the scope of this document completely.
Shutdown of the AMI instance
There is nothing more to shutting down the WURFL Microservice instance than shutting down any deployed AWS AMI.
Simply open the AWS AMI instance dashboard, select your WURFL Microservice instance, right-click on it and select Instance State > Stop.
Note: Be aware that stopping/restarting the WURFL Microservice instance will clear the Client API cache. Depending on the use you are making of the API this may result in diminished performance as the API “warms up” and the cache is recreated at every AMI launch.
Conclusions
This tutorial on WURFL Microservice for AWS has hinged on a demo inspired by the Event Streams use case. We have seen how the WURFL AMIs available on the AWS Marketplace can be used to deploy a WURFL API in minutes as part of an existing relationship with Amazon Web Service (i.e. without licensing one of the classical on-prem WURFL APIs from ScientiaMobile).
This use case can easily be extended to other programming languages, other cloud vendors and other data analysis platforms, which is something we intend to do in the weeks to come.
We may amend this tutorial from time to time to point to those resources.
Further Resources
- Demo source code on GitHub.
- This tutorial is also available for Azure and .NET Core (C#).
- For those who do not wish to rely on the AWS Marketplace, licensing WURFL Microservice directly from ScientiaMobile is an option. The WM Server is deployed through Docker in that case (private ScientiaMobile repo).


